brh05.gif
Main Page - Lesson Deals - Lessons
Previous - Next
Contract Bridge
LESSON 15
The Double and Deep Finesse

  1. The Indirect Double Finesse
  2. The Direct Double Finesse
  3. The Triple Finesse
  4. Finessing when holding the Q and J
  5. The Free Finesse
  6. The Bath Coup
  7. Deals 45 to 52
  8. Quiz - Answers - Review

    Bidding Guide : 11
    Solo Play


(
Down Fast - Top)

BR 15.1 - The Indirect Double Finesse

A double finesse is a finesse against 2 missing honour cards simultaneously. A double finesse is the preferred option when your side holds 8 cards or less in the suit. With 9 cards a simple finesse or playing for a drop of an enemy honour have better odds.

With 8 cards or less : double finesse !

Finesse Situation 16 - Indirect double finesse against the King and Jack

In the situation below the Opponents hold the King and Jack of Hearts.

br15/br1501.gif

Declarer first leads a low card from his hand. West plays low and Dummy plays the 10
  1. if East wins with the Jack (Diagram A)

  2. next time Declarer gains the lead (Diagram B) he leads a second small Heart.
    If West plays low again Dummy plays the Queen, which in 75% of the cases will win the trick.

  3. However if at the first trick East captures Dummy's 10 with the King (Diagram C), no second finesse is necessary, as Dummy's Queen is now a winner.
br15/br1502.gif

What are the odds of this finesse play ? Half the time the 2 missing honours are divided between the two Opponents, the other half they are together in one of the hands. The illustration below shows the four possible holdings.

br15/br1503.gif
In case a and b the first finesse will lose, but the second will win or not be necessary.
In case c both finesses will be successful and no trick will be lost at all. In case d however both finesses will lose and be captured by East.
Overall a 75% success rate of winning at least 2 tricks out of 3.


(
Down - Up - Top)

Finesse Situation 17 - Indirect double finesse against the King and Queen

In the situation below the Opponents hold the King and Queen of Hearts.
In this case both finesses are always necessary. You will win 2 tricks 75% of the time, but in the process always lose one trick to the opposition too.

br15/br1504.gif


(
Down - Up - Top)

Finesse Situation 18 - Indirect double finesse against the Ace and Queen

No matter how you play the situation below you will always win at least one trick. The double finesse however provides better odds for masking two or even three tricks.

br15/br1505.gif

Declarer first leads a small hand from his hand. If West plays low Dummy plays the 10
  1. if East wins with the Queen (Diagram A)

  2. next time Declarer gains the lead he plays a second small Heart. If West plays low again Dummy plays the Jack which wins
    Declarer, when back in his hand play low for a third time to Dummy's King.

  3. If at the first trick East wins Dummy's 10 with the Ace (Diagram C), Declarer can, when on lead again, play low again to Dummy's Jack for a finesse against West's Queen.
br15/br1506.gif

Obviously with the Opponents holding the Ace which always wins a trick, the odds are less than in Finesse situation 16. The illustration below shows the possible honour distributions.
br15/br1507.gif

In case a the Opponents will win both Ace and Queen, but provided there are 4 Hearts in Dummy, two tricks can still be won.
In cases b and c Declarer's side will always win two tricks, losing only one trick to the Ace.
In case d however the Opponents will always win both Ace and Queen.

Therefore with Dummy holding K J 10 bare Declarer's side will win 2 out of the 3 tricks 50% of the time. With a 4th small card in Dummy winning 2 tricks out of 4 has a 75% chance of success with a third trick a good possibility.


(
Down - Up - Top)

Finesse Situation 19 - Indirect double finesse against the Queen and Jack

Occasionally you may wish to execute a double finesse against the Opponents' Queen and Jack. An important secondary objective often being to avoid one specific Opponent (West in the example below) from gaining the lead. In such case you need the 9 in addition to the A, K and 10.

br15/br1508.gif

  1. Declarer plays a small Heart from his hand, West plays low, Dummy plays the 9 and East wins with the Jack (Diagram A)

  2. Next time Declarer gains the lead he leads a second small Heart, West again should play low (there is nothing to gain by playing the Queen) and Dummy wins with the 10

  3. The next two tricks are then won by Dummy with the Ace and King, West's Queen dropping on one of these tricks.

When holding 7 cards in the suit this line of play has a 75% chance of making 3 tricks, compared to less than half that chance (36%) by playing A, then K, then small and hoping for a 3-3 split of the Opponents Hearts.


(
Down Fast - Up - Top)

BR 15.2 - The Direct Double Finesse

A direct double finesse works in much the same way as an indirect one. The odds too are exactly the same. However for a direct finesse, being by nature more expensive in terms of high cards, you need to hold 4 of the top 6 cards. This brings the 9 into the scheme of play.

Finesse Situation 20 - Direct double finesse against the King and Queen

With the King and Queen held by the Opponents, Declarer leads the Jack from his hands.

br15/br1509.gif
  1. If West plays low, Dummy plays low too and the trick is won by East (Diagram A)

  2. When next on lead Declarer leads the Heart 10 from his hands. If West plays low, Dummy plays low, and Declarer wins the trick. The 3rd trick is won by Dummy's Ace

  3. If West covers the 10 with his King, Dummy wins with the Ace, and Declarer's 9 is now a winner for a 2nd trick (Diagram C).
br15/br1510.gif


(
Down - Up - Top)

Finesse Situation 21 - Combined double finesse against the King and Queen

In some situations you have the choice of both direct and indirect double finesses, like the case below. Here for example Declarer can first take a direct finesse by leading the 10 from his hand (Diagram A). Then when next on lead he can play a small Heart to Dummy's Jack for an indirect finesse (Diagram B).

br15/br1511.gif

Or he can play these finesses in the reverse order.


(
Down Fast - Up - Top)

BR 15.3 - The Triple Finesse

In a triple finesse the Opponents hold 3 of the 5 honour cards, the lowest one usually being the 10, but occasionally it can be the Jack instead.
Typical holdings of the Declarer side must

  • for an indirect triple finesse consists of 2 honours plus the 9

  • for a direct triple finesse consists of 2 honours plus the 9, 8 and 7
Typical holdings for an indirect deep finesse are :

A Q 9       A J 9       K J 9       Q J 9       Q 10 9

The main hope in all cases is that the dummy's honours sit over (rather than in front of) two of Opponents' honours, including the 10 (or Jack).

Finesse Situation 22 - Indirect triple finesse against the King, Jack and 10

In the example below Declarer hopes that West will hold the King and 10 (or better still the Jack and 10).
br15/br1512.gif

  1. First Declarer plays a small Heart from his hand, West plays low, Dummy plays the 9 and East wins with the Jack (Diagram A)

  2. Next time Declarer gains the lead he leads a second small Heart, West again should play low (there is nothing to gain by playing the King) and Dummy wins with the Queen (Diagram B), with Dummy's Ace winning the second trick in the suit
If the enemy hearts break 3-3 as in the example above, Dummy's remaining small Heart is a third Heart winner.
.

(
Down - Up - Top)

Finesse Situation 23 - Direct triple finesse against the King, Queen and 10

The example below shows just how expensive a direct deep finesse can be when the Opponents are on their mettle. Without the humble 7 Declarer will get nowhere.

br15/br1513.gif

  1. Declarer first leads the 9 of Heart from his hand, West plays the 10, Dummy covers with the Jack and East wins with the Queen (Diagram A)

  2. Next time Declarer gains the lead he leads the 8 of Hearts , West plays the King which is captured by Dummy's Ace (Diagram B).
    All cards from the 8 upwards are now gone and Declarer's 7 wins his 2nd trick in the suit.

Why was West this time committing suicide covering every time Declarer's lead, rather than playing low as in previous examples ?
Because he had nothing to lose, but a small chance to gain a trick in case his Partner (East), instead of Declarer, possessed that victorious 7.


(
Down - Up - Top)

BR 15.4 - Finessing when holding the Queen and Jack

Holding only the Queen and Jack in a suit is a common occurrence in numerous hands. Preferably let the Opponents attack the suit first. It will make your life as Declarer much easier.
However sometimes you have no other option than to start the suit yourself.

  1. with   Q J x   in Dummy
    Lead a small card from your hand to the Jack, and a second time to the Queen

  2. with   Q J 9 x   in Dummy, and trying to make 2 tricks
    lead a small card from your hand to the 9, and a second time to the Jack, unless the preceding Opponent plays the A or K

  3. with   Q J 10   in Dummy,     or   Q J x   opposite   10 x
    There is nothing to finesse ! The 10 and Jack will force out Opponents' A and K and your Queen will always make a trick, provided you do not play 2 of your honours on the same trick !

  4. with   Q x x   opposite   J x (x)
    Do not touch it !. If you do you are most likely to lose the lot.
    Waite for the Opponents to lead the suit, when they do a certain trick is assured (see Finesse Situation 25)

  5. with   Q x x   opposite   J 9 x
    First always play a low card to the Queen (Diagram A below), then, on regaining the lead, lead from the other side a small card for a deep finesse to the 9 (Diagram B).
Finesse Situation 24 - Indirect triple finesse against the Ace, King and 10

Play the deep finesse to the 9 (against the 10) always only the second time (Diagram B below).The Opponents may be silly enough to play their 10 on the first round, or it may simply drop. Cover the percentages !

br15/br1514.gif


(
Down Fast - Up - Top)

BR 15.5 - The Free Finesse

You may hold a card combination where there is no finesse possible, or one which has only a minute chance of success. But suddenly, when the Opponents lead the suit, a finesse emerges which will cost you nothing and is likely to succeed. Why is this so ? Because either Dummy or you (Declarer) are the last player to play to the trick, a huge advantage.
Here follow three classical examples.

Finesse Situation 25 - Free finesse against the Ace and King

As mentioned above, avoid leading this suit yourself.
When an Opponent leads the suit, play LOW both sides (Diagram A), unless they try to win the trick with the 9 or 10.In that case win the trick in the hand that plays last (Declarer's hand in the example below).
br15/br1515.gif

When they lead for the next trick play low again (Diagram B), and the third is guarantied yours !
.

(
Down - Up - Top)

Finesse Situation 26 - Free finesse against the Queen

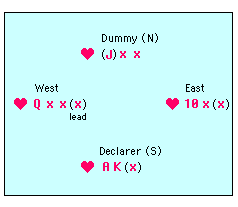
West leads 4th highest from his longest suit headed by the Queen. Not an unreasonable lead, but it presents a potential gift to Declarer.
Play the Jack from Dummy for a free finesse. It was never going to make a trick, but if West holds the Queen (as in the Diagram below) it wins an unexpected extra trick.
br15/br1516.gif


(
Down - Up - Top)

Finesse Situation 27 - Free finesse against the Queen and Jack

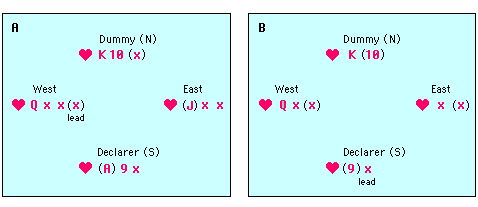
Once again West leads the 4th highest from his long suit. Dummy plays LOW again, East plays the Jack which is captured by Declarer's Ace (Diagram A)
br15/br1517.gif

Declarer can now finesse against the Queen by playing a small Heart (or the 9) to Dummy's K 10 tenace.

Notice something familiar about this diagram ?
Yes of course, apart from the suit lengths it is the same as in Finesse Situation 25 but turned 90 degrees. Whichever side leads this suit first will give a trick away to the Opponents.
It is a powerful example of the general rule :

When the top four honours are divided equally over the four hands, the side

that leads the suit first will give away an extra trick to their Opponents !


(
Down - Up - Top)

BR 15.6 - The Bath Coup

Finally the famous "Bath Coup".

Finesse Situation 28 - The Bath Coup

West made an overcall in Hearts, but South eventually ended up in a No Trump contract.
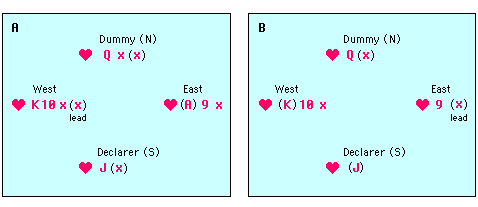
West makes the standard opening lead of the King of Hearts (top of touching honours in an 'interrupted sequence'). Dummy and East both play low.
What should Declarer do, win with his Ace ?     No !

Declarer plays low too and West wins the trick (Diagram A).
But what next ?   West is now in a great dilemma (Diagram B).

br15/br1518.gif

  1. If West leads his Queen next, Declarer will capture it with the Ace and gain an extra stopper and eventual trick with his Heart Jack.

  2. If on the other hand West plays a low heart instead, Declarer will win the trick with the Jack and keeps his Ace for a stopper and extra trick later in the game.
West's best bet is to switch to an other suit, hoping to bring his Partner on lead to play through Declarer's Ace Jack holding.
This is of course something Declarer must aim to prevent. Meanwhile however he has stopped West from developing his long strong Heart suit.


(
Down - Up - Top)

BR 15.7 - Deals 45 to 52

Deals 45 to 52 are examples of play as outlined in this lesson.


BR 15.8 - Quiz 15 - Answers - Review

(Up - Top - Links page)

Copyright © 2006 Michael Furstner (Jazclass). All rights reserved.