rch01.gif
Rhythm Class 1
Timing Practice

  1. Introduction

  2. Instrumental Technique

  3. Timing - Ear Training

  4. Breathing

  5. Practice Material

    LIBRARY - Jazclass Links


Lesson | 1 | 2 | 3 | 4 | 5 | 6 | 7 | 8 | 9 | 10 | 11 | 12 | ? ? |


(
Down - Top)

RC 1.1 - Introduction

rcmf.jpg Hello and Welcome to the Rhythm Class.

Apart from a few exceptions Jazz and Blues music uses the same scales and modes as in Classical music and other styles of music.
Jazz and Blues songs and improvisations are therefore largely defined by their characteristic rhythms. A good understanding of these rhythms is therefore essential for any Jazz musician.
The Rhythm Class provides this understanding and includes a large range of rhythmic material for you to develop your skills.


I suggest you devote each day about 5-10 minutes of your practice time on Rhythm exercises as outlined in this course until you are fully satisfied with your rhythm skills.

There are two important elements to playing rhythms.

  1. The ability to play typical Jazz rhythms.

  2. The ability of precise timing.
    Without good timing rhythm patterns are blurred and ambiguous, like out-off focus photographs.
In this Lesson we focus on the aspect of developing good timing.


(
Down - Up - Top)

RC 1.2 - Instrumental Technique

Precise timing of the notes is one of the essential characteristics of all really good players. Without precise timing the music becomes blurred and mediocre, lacking energy and interest.
Good timing takes years to develop, and you really need to work at it to make it happen.

Good timing skill is developed on two fronts :

  1. developing the correct instrumental technique,

  2. developing a good timing sensitivity of the ear.

Below some comments on relevant instrumental technique.


Keyboard
Focus on the moment each note starts to sound, the so-called point of sound.

The moment the note sound starts is :

  1. not when the finger starts to move down towards the keys

  2. not when the finger first touches the key

  3. not when the key has reached the bottom of the keyboard.
rc0101.gif

The point of sound is somewhere between the points 2 and 3 above.
On acoustic pianos and top quality electronic keyboards this point of sound is consistent for all keys.
On cheaper electronic keyboards the point of sound may vary somewhat from one key to the next. Be aware of this.


Saxophone and Clarinet
Many sax and clarinet players breath and tongue the following note more or less at the same time. This produces very sloppy timing (always late) and a poor quality tone.

Good tongue articulation requires the smooth integration of four steps.
Bring the instrument to the mouth and assume the correct embouchure position.
Then :

  1. inhale (by dropping the jaw)

  2. press the tongue against the tip of the reed

  3. bring air pressure into the mouth and to the point of the reed

  4. release the tongue from the reed

All following notes are articulated by tongue action alone (steps 2 and 4), while maintaining continued and constant air pressure in the mouth.
The air pressure in the mouth is maintained throughout until the next breath is required. Then steps 1 to 4 are executed again.

Steps 2, 3 and 4 should be in a fluent motion.
Practise them slowly at first. Eventually you will be able to do this in a fraction of a second. This will result in playing each note on time and with a good tone right from the start.


Other wind instruments
Other wind instruments like flute and brass players should follow a similar technique as above. The only difference is that this time the tongue is not touching a reed, but a mouthpiece or the roof of the mouth. The air pressure should be locked right behind the tongue before a note is played (by simply releasing the tongue).


Guitar, Bass
On the guitar and bass the point of sound occurs when the finger releases the string, not when it first touches the string.
Inexperienced bass players are invariably late with their playing of each note because they synchronise the point where their finger first touches the string with the timing of the beat.


(
Down - Up - Top)

RC 1.3 - Timing : Ear training

As a College music student I always carried a small wind-up metronome in my saxophone case, which I used during practice.
My saxophone teacher used to get nervous each time I used it during a lesson. It was beating time irregularly he claimed. I could not hear or understand what he was talking about.

About 5 years later I found the device again in my studio, wound it up and listened to it. At once I could hear what my teacher had been talking about. The instrument's action was clearly uneven. It had taken years for my ear to develop to this "fine tuning" stage.


The average ear (like mine at the time, even after listening to music for 30 years) has a rather crude sense of timing. Each downbeat is perceived within an approximate time span within a bar.
In reality each downbeat is a clearly defined instant which the practised ear will gradually start to pick up with ever increasing precision.

rc0103.gif

To develop your ear I recommend the following :

  1. When practising scales, arpeggios and technical studies use a metronome for half the time. The other half do these exercises without a metronome.

  2. Play slow ballads with a play-a-long track or a metronome, placing the melody notes as accurately (according to the notated music) as possible. Tape your effort from time to time and listen to it (but not too frequently : it is a humbling exercise I can assure you).

  3. Hand-clap the rhythms of Rhythm Patterns using a metronome. You can also clap the rhythms of songs. Tape the results from time to time.

  4. Play-a-long with the midi files provided in this course. They are computer generated and all in perfect time. Use 'Band in a Box' (or a similar program) to generate play-a-long tracks.

  5. Be aware of your timing all the time and with every note you play.

  6. Listen to music with a special focus on timing of the various performers.

  7. Practise the Metronome Timing Exercises below.

Timing Exercises
Play each metronome track and clap your hands on the specified beat. Do not tap your foot or make any other rhythmic movement with your body. Sit still, keep your eyes closed and concentrate on the beats.

In each exercise the metronome beat starts like this :

1 - 3 - / 1 2 3 4 / 1 - - -

  1. Timing Exercise 1 :   Tempo 120 bpm   90 bpm - Clap your hands on beat 1 of each bar.

  2. Timing Exercise 2 :   Tempo 120 bpm   90 bpm - Clap your hands on beat 1 of every 2 bars.

rc0104.gif

James Morrison, a well known Jazz trumpet player in Australia, used to do the following exercises at the start of each rehearsal with his regular band.
All players sit in a circle with their eyes closed, perfectly silent. One player counts in the first chorus of a 12 bar blues : 1 - 3 - 1 2 3 4.
On the first beat of the second chorus (that is after 48 beats) all players clap their hands. Same again on each following chorus.

James claims that the joint timing of the band improved so much that they eventually could count and clap 4 or 5 choruses like this and still be all together in time.


(
Down - Up - Top)

RC 1.4 - Breathing

Besides good timing, good breathing is one of the hallmarks of every competent musician.
Bad breathing can destroy the music. Good breathing, in phase with the flow of the music (regardless the instrument you play) brings coherence, life, vitality and meaning to the music. I was first made aware of this when my piano teacher pencilled the breath marks in my piano scores.

rc0107.jpg During my music studies in the 80s I was fortunate enough to play in the Adelaide University Concert Band (then 'South Australian College of Advanced Education Concert Band') under the direction of the legendary conductor and Jazz Educator Hal Hall. This band won consistently, year after year, the first price in the top grade of the annual National Band Championships in Australia, setting the musical standard for all other concert bands throughout the country.

I remember on one day, during the rehearsal of a rather demanding piece of music, we just could not get it together. Each player was on top of his/her part of the music but together it simply failed to jell.

Suddenly we realised that the problem might lie in our breathing. And yes, this proved to be the case. All brass and woodwind players were nicely breathing together at the same spots in the music, but the 7 members of the rhythm section had no breath marks written on their scores at all.
After borrowing one of our properly marked scores and adding the breath marks to theirs we tried again, and at once all instruments jelled together and the music started to flow beautifully as it should. A wonderful experience and memorable lesson for all of us !

Always take a breath at the end of a music phrase (regardless whether you need to or not).
Most phrases are about 4 bars long, often with a musical "comma" in the middle after 2 bars.
For medium to up-tempo songs you should be able to take a breath at the end of each 4 bar phrase comfortably. For slower pieces you can generally take a breath at the commas as well.
Breathing in at any other place disrupts the flow of the music and destroys its energy and meaning. Even when there are rests in each bar, discipline yourself to hold your breath (winds) or keep breathing out (keyboards, strings, percussion) until the proper musical point.
When playing in a group make sure everyone is taking breaths at the same time. Synchronised breathing is a very powerful force, not only in music. It establishes emotional and spiritual connections and an environment of unity, peace and tranquility.

When practising all Rhythm Patterns of this course (from Lesson 3 and onwards) take a breath at the end of every 2 bar segment or combine 2 segments together and take a breath at the end of every 4 bars, as shown below.
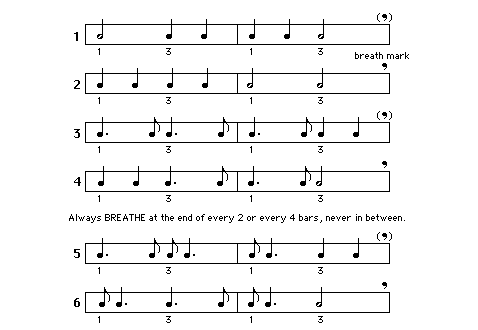
rc0105.gif

In songs phrases may not always start at the beginning (beat 1) of a bar or end at the very end (beat 4) of a bar as for example below. So watch out for this and pencil in the breath marks after you have played the melody a few times and get to know its rhythmic structure.
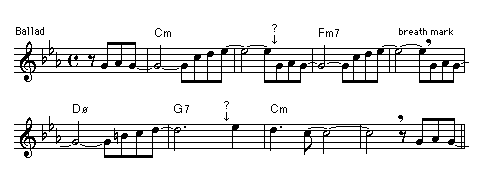
rc0106.gif


(
Down - Up - Top)

RC 1.5 - Practice Material


Timing Exercise 1 :   Tempo 120 bpm   90 bpm Clap your hands on beat 1 of each bar.

Timing Exercise 2 :   Tempo 120 bpm   90 bpm Clap your hands on beat 1 of every 2 bars.


(Up - Top)


Copyright © 2004 - 2008 Michael Furstner (Jazclass). All rights reserved.