(Down Fast - Up - Top)
BR 10.3 - Direct Finesse against the Queen
Finesse Situation 12 - Direct finesse against the Queen
In the Diagrams below the Opponents only hold the Queen of Hearts, and Declarer leads the Jack for a direct finesse.
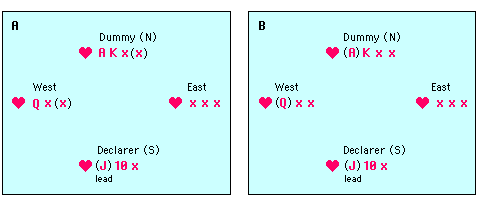
- If West plays low (Diagram A), Dummy also plays a low card, and the Jack wins the trick.
South then leads the Heart 10 (provided he holds the 9 too) for a second direct finesse, or leads a small card to Dummy's Ace and King.
- If West plays the Queen (Diagram B), North plays the Ace. This leaves the King and 10 for two extra tricks (and a 3rd trick for the remaining small Heart).
- If, on the other hand East holds the Heart King (Diagram C), South's Jack will lose the first trick. However the Ace, Queen and 10 still will provide the next three tricks in Hearts.
If you have plenty of entries it is always best to first of all lead Dummy's Ace, then gain the lead in Declarer's hand via a side suit to start the direct finesse.
(Down - Up - Top)
Finesse Situation 13 - Two way finesse against the Queen
The Diagrams below is the same as in Situation 9 from ther previous lesson.
This two-way finesse can be taken either as an indirect or a direct finesse.
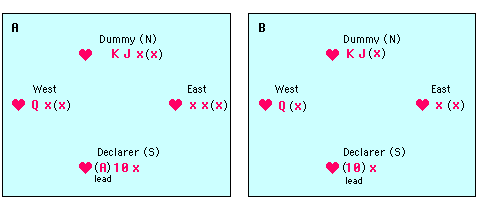
After you have made your decisions against which player you wish to finesse.
- First play one round with one of your top cards first (A or K) to play for the "drop" (of a high card of the Opponents).
In above example play Declarer's Ace (Diagram A).
- Then lead the 10 for a direct finesse against West's Queen (Diagram B).
- If the 10 wins the trick, play a low card from Declarer, this time for an indirect finesse.
- If West plays again low, play Dummy's Jack.
If West plays his Queen, capture it with Dummy's King. The Jack is now a winner for the next trick.
(Down Fast - Up - Top)
BR 10.4 - The Ruffing Finesse
The ruffing finesse is a special variety of the direct finesse.
- In a ruffing finesse a high card is lead from one hand to a trump card in the opposite hand.
- If the Declarer leads the high card and the left hand Opponent covers it with his high card the trick is ruffed by Dummy.
- If on the other hand the left hand Opponent plays a low card Dummy discards a loser from one of his side suits.
- A ruffing finesse usually needs to be taken before drawing Opponents trumps, because you need to have trumps in Dummy to carry out this technique.
This is a very productive line of play, for even if the finesse loses to the right hand Opponent, Dummy has been able to discard a loser. This has the effect of getting rid of two losers (the lost finesse trick plus the loser in Dummy's side suit) on the one trick.
(Down - Up - Top)
Finesse Situation 14 - Ruffing finesse against the Ace
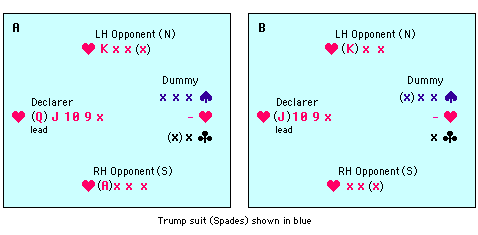
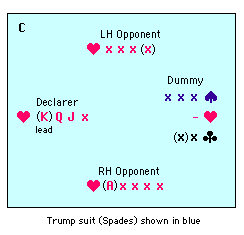
In the example below Declarer leads the King of Hearts as a finesse against the Ace.
- If the left hand Opponent plays low, a losing card in one of Dummy's side suits is discarded (a small Club in Diagram A).
- If on the other hand the LH Opponent covers Declarer's King with the Ace, the trick is ruffed in Dunmmy (Diagram B).
- Declarer's Queen and Jack are now established winners to be cashed in immediately (discarding on it Dummy's two Club losers), or after drawing the Opponents trumps.
If the LH Opponent plays low first time, Declarer leads the Heart Queen for a second finesse, and the Opponent is faced with the same situation once again.
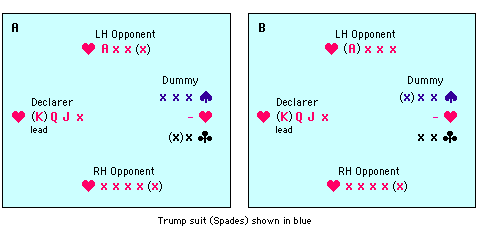
Now look what happens if this finesse loses to the right hand Opponent (Diagram C).
Although the trick is lost, Dummy still has discarded a loser from his side suit. Therefore a positive outcome is still achieved. Also Declarer's Queen and Jack are now established winners for future tricks.
(Down - Up - Top)
Finesse Situation 15 - Ruffing finesse against the King
In the situation below you can take an indirect finesse against the King by playing a low Heart from Dummy to Declarer's Queen. However you can take this finesse only once. If South holds the King and plays low, you can not finesse it again.
A direct ruffing finesse is therefore much better.
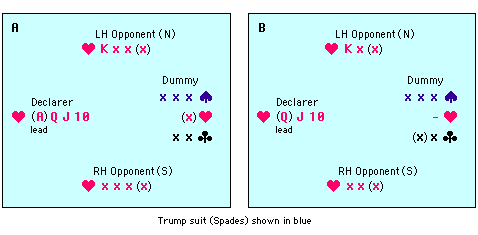
- First play one round of Hearts winning the trick with Declarer's Ace. Dummy is now void in the suit (Diagram A).
- Declarerer now leads his Heart Queen for a ruffing finesse against the King.
- If North plays low Dummy discards a loser in Clubs (Diagram B).
- If North plays his King, it is ruffed in Dummy, and Declarer has now established his remaining Hearts as winners. He can cash those after drawing the Opponents trumps.
(Down - Up - Top)
Finesse Situation 16 - Ruffing finesse against the Ace and King
Occasionally, when you hold the Queen, Jack and 10 (or better) in a long side suite you have the opportunity to establish that suit by a ruffing finesse against both the Ace and the King.
The great attraction here is that, although you will almost always lose at least one trick, you will be able to discard a side suit loser (if you have any) at the same time.
In the example below Declarer leads his Queen of Hearts.
- LH Opponent (unless he holds both Ace and King) will always play low. Dummy discards a small losing Club and South wins the trick with the Ace (Diagram A below).
- Next time Declarer regains the lead he plays his Jack of Hearts, probably covered by North's King, which is ruffed by Dummy (Diagram B).
- After drawing all Opponents trumps, Declarer's remaining Hearts are now established winners.
