brh11.gif
Main Page - Lesson Deals - Lessons
Previous - Next
Contract Bridge
LESSON 9
The Indirect Finesse

  1. General
  2. Indirect Finesse against the Ace
  3. Indirect Finesse against the King
  4. Indirect Finesse against the Queen
  5. Finesse Thinking
  6. Deals 21 to 24
  7. Quiz - Answers - Review

    Bidding Guide : 11
    Solo Play


(
Down - Top)

BR 9.1 - General

There are four different ways of making tricks in contract bridge.
br00/brillkh.gif

  1. with high cards

  2. with the low cards of a long suit

  3. with trumps, by ruffing (in trump contracts only), and

  4. with almost high cards, by finessing

The finesse technique forms an important part in the game plan for most bridge deals. In this lesson and in Lessons 10 and 15 we look at this technique in detail. What it is, how to apply it, and equally important, when not to apply it.

To quote the famous bridge writer Victor Mollo :

"The finesse is a play entirely based on hope.
Hope that a specific card is held by one defender and not the other."

There are two basic forms of the finesse, the Indirect finesse and the Direct finesse.
  • In an Indirect finesse a low card is lead from one hand to a high card in the opposite hand.

  • In a Direct finesse a high card is lead from one hand to a still higher card in the opposite hand.

In this lesson we deal with the Indirect finesse. The Direct finess will be discussed in the next lesoon.


(
Down Fast - Up - Top)

BR 9.2 - Indirect Finesse against the Ace

In an Indirect finesse a low card is lead from one hand to a high card in the opposite hand.

Finesse Situation 1 - King against Ace and Queen
Take the Heart distribution in Diagrams A and B below for example.
If you were to lead the King of Hearts from Dummy it is obvious that whoever holds the Ace will capture the King, preventing it from making a trick.

Lead therefore a small card from Declarer's hand.

br09/br0901.gif

  1. If West plays the Ace (after Declarer's small Heart lead) Dummy plays a low Heart as in Diagram A.

  2. If West plays a small Heart (or Heaven forbid, the Queen) , Dummy wins the trick with the King (Diagram B).

  3. If East holds the Ace instead, Dummy's King will be captured and not make a trick.
This line of play will have a 50% chance of success. Half of the times the Ace will be held by West, the other half East will hold it.


(
Down - Up - Top)

Finesse Situation 2 - King and Queen against the Ace
In the Diagrams below both the King and Queen are in Dummy's hand.
Declarer leads a small Heart from his own hand.
  1. If West is foolish enough to play his Ace (Diagram A), Declarer's worries are over having established both Dummy's King and Queen as certain future winners in Hearts.

  2. If West plays low (Diagram B), Dummy plays the King which will win the trick if East plays low too.
    But now Declarer needs to regain the lead in his own hand (via another suit) to lead an other small Heart for a second finesse towards Dummy's Queen.
br09/br0902.gif

If West holds the Ace he should always play low the first time, unless he fears (in a trump contract only) that Declarer has a singleton Heart suit.

If East has the Ace of Hearts instead he may well also hold up the Ace the first time, playing a low Heart instead (Diagram C).

br09/br0903.gif

This will give Declarer the false impression that West holds the Ace.
When Declarer finesses the second time around, East will strike with his Ace (Diagram D). Having removed Declarer's only remaining stopper in the suit (HQ), East (in a NT contract) will now win 3 tricks in Hearts (the Ace, Jack and the last remaining small Heart).


(
Down - Up - Top)

Finesse Situation 3 - King and Queen in separate hands against the Ace
In the situation below you are faced with a choise. You can play a low card from Declarer for an indirect finesse to Dummy's Queen. Or you can instead lead a small card from Dummy for an indirect finesse to Declarer's King.
The choice you make may depend on the circumstances. For example has West made a bid during the auction ? If so perhaps he is more likely to hold the Ace. No matter how you play you will always make one trick with either the King or the Queen. However the aim is to make 2 or 3 tricks in this suit.
Let's be brave and lead a small Heart from Declarer for an indirect finesse to Dummy's Queen.

  1. if Dummy's Queen wins the trick (Diagram A), play next round a small card from both hands, hoping West's Ace will drop.

  2. if Dummy's Queen loses to East's Ace (Diagram B), when next with the lead play the King of Hearts hoping to drop the Jack.
br09/br0904.gif

There are many factors at play here which may change the scenario of course. For example who hold(s) the 10 and the 9 in this suit. More about this later.


(
Down Fast - Up - Top)

BR 9.3 - Indirect Finesse against the King

Definition
Two cards separated by a one card gap is called a tenace. For example A Q - K J - Q 10 - J 9 - etc.

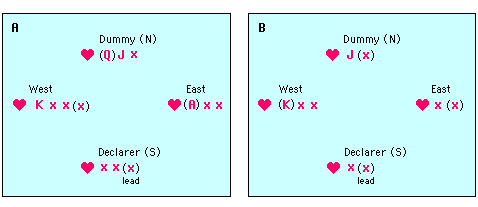
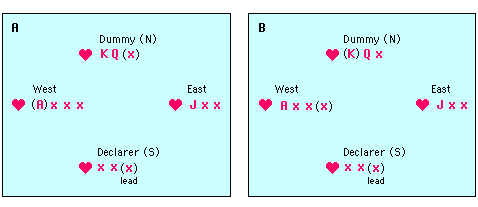
Finesse Situation 4 - Ace Queen tenace against the King
Here the Hands of West and Dummy from situation 1 are reversed.

br09/br0905.gif

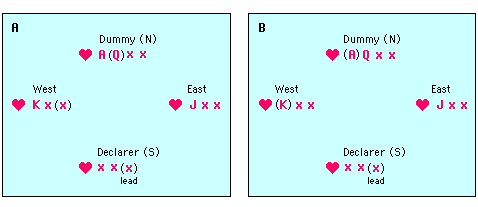
Once again lead a small Heart from Declarer's hand

  1. If West plays a low Heart, you win the trick with the Queen from Dummy (Diagram A).

  2. If, on the other hand, West plays the King instead, you capture it with Dummy's Ace, promoting the Queen as a winner for the next trick (Diagram B).

  3. If East holds the Heart King instead (Case C below) there is nothing you can do and Dummy's Queen will be captured by the Opponent.

br09/br0906.gif

This type of Finesse has a 50% chance of success. Half the time the missing King will be in West's hand, half the time it will be in East's hand.


(
Down - Up - Top)

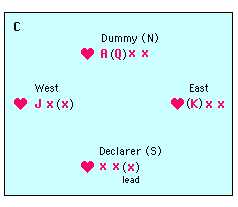
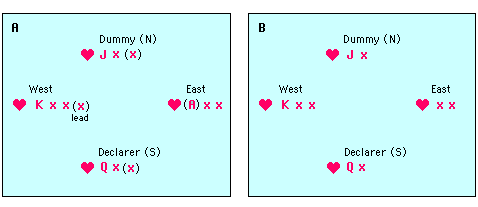
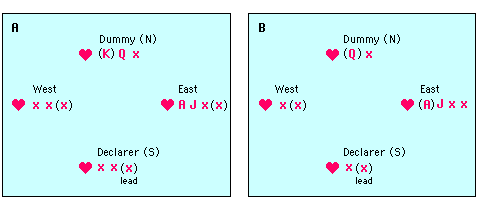
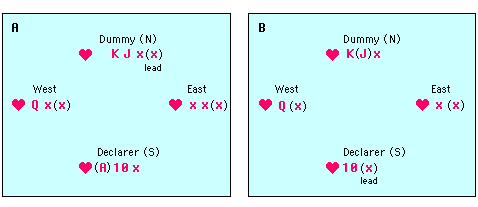
Finesse Situation 5 - Ace and Queen in separate hands against the King
In general when the honour cards in a suit are divided equally amongst the four players (as in the example below) it is usually best to avoid leading that suit.   Leading such suit often results in giving an extra trick away to the Opponents.   Try instead to make them lead that suit, so that your side will have the advantage.

However when you do have to lead such a suit (for example to make just one more extra trick), then take an indirect finesse.   In the example below lead a low card from Declarer's hand.

  1. If West plays the King (winning the trick), play low in Dummy. Next time round the Heart Queen will make an extra trick. (Diagram A)

  2. If West plays low, play Dummy's Queen. It will win the trick provided West holds the King (Diagram B)

  3. If East holds the King, Dummy's Queen will not make a trick.
br09/br0907.gif

When you hold 8 or more cards in the suit with above Honour distribution it is best to first lead the Ace. It may drop a singleton King. Then follow up with a low card from Declarer in an indirect finesse to Dummy's Queen.


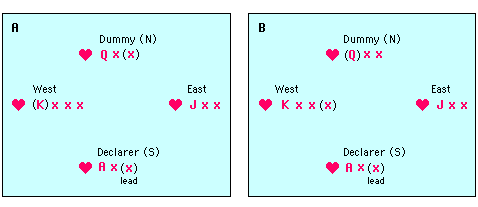
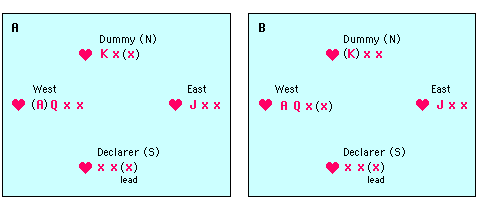
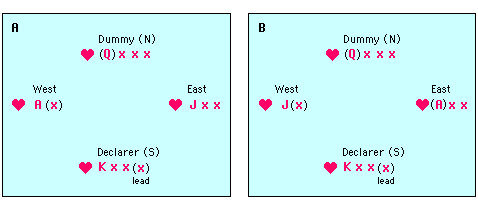
The play below is something you should definitely not do.
Against good defence leading the Queen from Dummy will never make an extra trick.
  1. Either West will capture the Queen and win the trick with his King (Diagram A),

  2. or East will cover the Queen with his King, forcing Declarer to win the trick with the Ace (Diagram B). By sacrifycing his King East prevents Declarer making a second trick in the suit, while at the same time promoting West's Jack as a winner for the Defence.
br09/br0908.gif


(
Down - Up - Top)

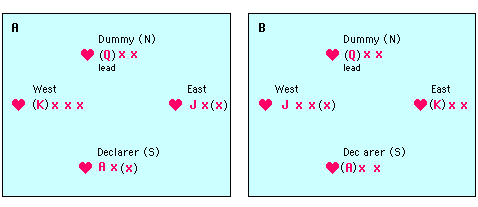
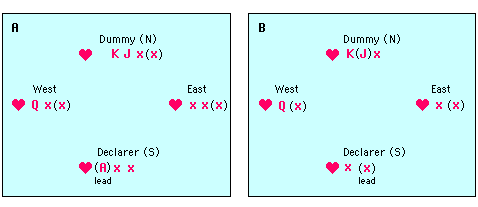
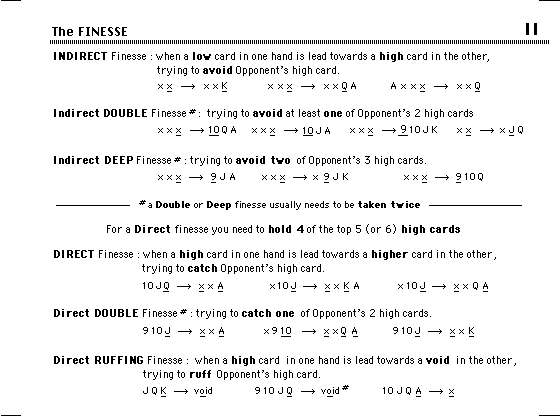
Finesse Situation 6 - Queen and Jack against the Ace and King
This is a very common card holding. Obviously when you first lead the Queen from Dummy and at a later trick the Jack you will loose the trick both times. But an indirect finesse play has a 75% chance of making at least one trick.
In the example below lead a small card from Declarer's hand.

br09/br0909.gif

  1. If West plays low (which he should, unless he holds both A and K or a K x doubleton), play Dummy's Queen (or Jack). Most of the time this will be captured by East's Ace (Diagram A).

  2. When next on lead Declarer plays a second small Heart from his hand. If West plays his King, play a low card in Dummy (Diagram B). The Jack is now a sure winner for the next Heart trick.
    If West plays low (instead of the King), play Dummy's Jack. It will make the trick provided West rather than East has the King.

With two danger cards held by the Opponent 50% of the time they will be divided equally between the two hands. The other 50% of the time both cards will be in one hand, 25% of the time by West and 25% of the time by East.
Only when East holds both the A and K (25% chance) will you end up losing both Dummy's Q and J.


(
Down - Up - Top)

Finesse Situation 7 - Q and J in separate hands against A and K
This is a situation where you should not start playing the suit yourself. If you do you are most likely to loose the lot.
Instead be patient. Sooner or later the Opponents will play the suit. As soon as their first card is on the table (be it a high or a low one) you are assured of a trick.
In the example below West leads a small Heart.

br09/br0910.gif

  1. You must play low in Dummy, while East must go up with his Ace to win the trick (Diagram A).
    (If East plays low you win the trick in Declarer's hand with the Queen).

  2. Now a Heart trick is assured, for you still hold both the Q and J. One of these will force out the King and the other will win a trick.
It is a powerful example of not leading a suit when the honour cards are equally divided over the four hands.


(
Down Fast - Up - Top)

BR 9.4 - Indirect Finesse against the Queen

Finesse Situation 8 - Ace King and Jack against the Queen
With a distribution as shown below, before finessing against the Queen :

  1. first lead and win a trick with the Ace (Diagram A). You never know, you might be lucky and drop a singleton Queen.

  2. The following trick lead a small Heart from Declarer's hand.
    If West plays low, play the Jack from Dummy (Diagram B). If West holds the Queen, Dummy's Jack will win the trick. If East has it the Jack of course looses.

  3. If West plays the Queen instead, capture it with Dummy's King. It will win the trick and the following trick will be won with Dummy's Jack, which is now high.
br09/br0911.gif

When the Ace, King and Jack are all in the same hand (say the Dummy), try to play the first trick with the Ace. Then go back to Declarer's hand via a side suite and lead a low Heart from Declarer to Dummy's King - Jack (as in Diagram B above).

Eight ever, Nine never
This is a common advise regarding the finesse against a Queen when holding Ace, King and Jack.
It means

With 9 cards in a suite, the Opponents will only have 4 including the Queen. This is most likely to be a doubleton (Q x) or singleton (Q).

But keep in mind : this is only general advise. There may well be situations where circumstances dictate you should play differently. (For example in above situation : if it was vital to keep West off the lead, you would take the finesse, regardless how many cards you hold in the suite.)


(
Down - Up - Top)

Finesse Situation 9 - Two way finesse against the Queen
In the example below you have a choice. You can finesse either way for the Queen.
A good approach is to lead a small Heart from Dummy.

br09/br0912.gif
  1. If East shows any sign of hesitation or fumbles with his cards, finesse him for the Queen. If he plays smoothly win the trick with the Ace (Diagram A)

  2. The next trick lead a small Heart from Declarer, the play Dummy's Jack if West plays low (Diagram B), or cature West Queen (if he plays it instead) with Dummy's King.

Good Defenders, as soon as the Dummy goes on the table at trick one, will immediately asses which of their high cards could be vulnerable to a finesse situation, and decide then what their action is going to be. This assures that they can play their card smoothly without hesitation when the finesse is actually applied.


(
Down - Up - Top)

BR 9.5 - Finesse Thinking

Bridge is very much a percentage play, and the finesse technique fits of course right in with this principle.
Good players will always try to follow the line of play with the highest percentage rate of success. A finesse should therefore always fit in the overall game plan, rather than just be attempted every time there is such possibility.

Before the start of play always ask yourself :

  1. Will taking this finesse help with making my contract ?

  2. If this finesse looses, can it endanger my contract ?

  3. What are the odds of this finesse, and is there a better line of play ?
Here is an example of such thinking.
The contract is 4H, and the opening lead is the King of Diamonds.

Declarer
- K Q J 10 9 8
- 3 2
- A 7 3
- A Q
Dummy
- 7 6 2
- A Q 9 6 5
- 6
- 8 7 5 2

What is the game plan ?
There are 5 possible losers. One each in Spades, Hearts and Clubs, and two in the Diamond suit.
There are possible indirect finesses against the King in Spades and in Clubs, but there is only a small chance (25%) that both of these will be succesful.
Instead there is a 100% certainty of making your contract by ruffing the two small Diamonds from Declarer's hand.   Therefore,
  1. Declarer wins the first trick with the Diamond Ace.

  2. Before drawing the enemy trumps Declarer now leads a small Diamond which is ruffed in Dummy with the 6 of Hearts.

  3. A small Club played from Dummy is won by Declarer with the Club Ace ! !

  4. Declarer now leads his last remaing small Diamond, for a second ruff in Dummy.

  5. Declarer can now start drawing the enemy trumps and the 4H contract is secured.

  6. After drawing all enemy trumps Declarer can now safely lead a small Spade for an indirect finesse against the Spade King. This can not endanger the contract, but will provide an extra (11th) trick if succesful (a 50% chance which should not be missed).
Declarer
- K Q J 10 9 8
- 3 2
- 7 3
- A Q
Dummy
- 7 6 2
- A Q 9 6 5
-
- 8 7 5 2

Why not take the Club finesse at trick 3 ?
Because if it looses it will put the contract in danger. North after winning with the Club King (and guessing Declarer's intention) will immediately play two rounds of trumps (Ace and small), removing Dummy's ruffing power. Now everything depends on the success of the Spade finesse and if it looses the contract is doomed.

The above Deal is a clear example where one finesse (in Clubs) can endanger the contract, while the other (in Spades) can, at the appropriate time, provide an extra trick without any risk at all.


(
Down - Up - Top)

BR 9.6 - Deals

Deals 21 to 24 will test your skills at Finesse thinking and play.


BR 9.7 - Quiz 9   - Answers - Review

(Up - Top - Links page)

Copyright © 2006 Michael Furstner (Jazclass). All rights reserved.