kbh01.gif

Piano Technique 5
SCALES 2

  1. Using the Metronome
  2. The Harmonic minor scale
  3. The Blues scale
  4. The "Five Beers" Exercise
  5. Scales in Octaves
  6. Practice Material

    Subject Index - Topic Index

    PIANO LAB - Intro - Songs

Lessons | 1 | 2 | 3 | 4 | 5 | 6 | 7 | 8 | 9 | 10 | ?? |


(
Down - Top)

KT 5.1 - Using the Metronome

First practise without a metronome until you play all scales with correct fingerings and accents with confidence.
Then start using a metronome for scale exercises.

Midi fileTempo
MM = 5050 beats per minute
MM = 5555 beats per minute
MM = 6060 beats per minute

Use the metronome only half the time !
This way you develop your own sense of timing without becoming overly reliant on the metronome.

Tip
When you turn on the Metronome : first listen to it before you start to play.
Subdivide each beat in your mind into the required segments.
  • For scales in twos think : 1 and 2 and 3 and 4 and

  • For scales in threes think : 1 2 3 - 2 2 3 - 3 2 3 - 4 2 3

  • For scales in fours think : 1 2 3 4 - 2 2 3 4 - 3 2 3 4 - 4 2 3 4

Wait until the rhythm is firmly established in your mind, then start to play.

At first you may find that you tend to play ahead of the beat ("rush"), especially on the accented notes.
You need to learn to synchronise the point of sound (and not the point of first finger movement, or the point you touch the key) with the metronome beat.

kbt0001.gif The point of sound on an electronic keyboard is often located at a different level (usually higher) within the span of the key action compared to that of the acoustic piano. (Some of the cheaper electric keyboards may also be inconsistent in this respect.)

The key action is also much lighter on an electronic keyboard. This allows the finger to travel faster downwards and results in an earlier release of sound.

Be aware of these differences if you play both instruments.

Several Metronome midi files at various tempos are included in this Course.
However it is a good idea to buy a Metronome yourself. Make sure to select an electronic device. These are by far the most reliable. The old-fashioned wind up type instrument needs to stand perfectly horizontal to work anywhere near accurately.


(Down - Up - Top)

KT 5.2 - The Harmonic minor scale

The harmonic minor scale is, after the major scale, probably the most important scale in all Western music.
You should therefore practise both these scales in all twelve keys.

Major scale - Harmonic minor scale
kbt0501.gif

Fingering principles for the harmonic minor scale (and all other 7-note scales) are the same as for the major scale.

Fingering charts for the harmonic minor scale in all keys are included in the Lesson Material at the end of this lesson.


(Down - Up - Top)

KT 5.3 - The Blues scale

The Blues scale is also a good scale to practise, but wait with work on this scale until you are fluent in the major and harmonic minor scales.

Blues scale
kbt0502.gif

Make sure you lift each finger clearly off the keyboard through the semitone passages (4 - b5 - 5).

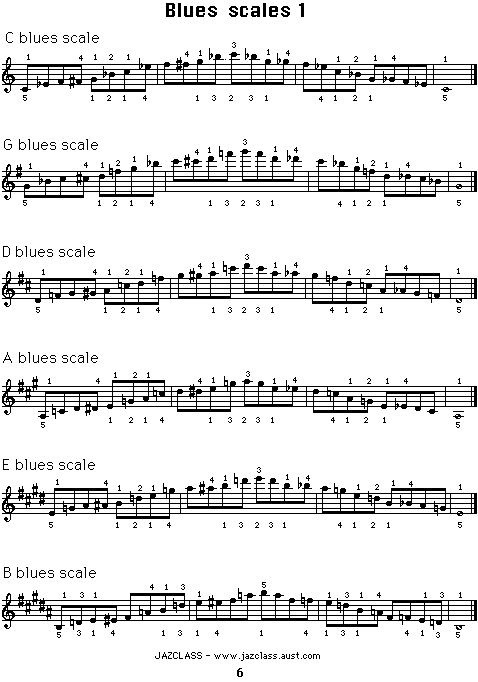
Several fingerings can be used for the Blues scale.

The RH pattern 131 1234 for the keys of C, G, D, A and E places the fourth finger of the right hand on the b7.

For short passages of the C, G, D, A, and E blues scales use the reverse RH pattern : 1234 131. This places the fourth finger on the b5.

The Blues scale is closely related to the ancient pentatonic scales.
It is formed by adding just one note (the b5) to the minor pentatonic scale.

The major pentatonic and related minor pentatonic share the same notes, only their starting points (tonic notes) are different.

For example :

C major pentatonic scale = C - D - E - G - A - C

A minor pentatonic scale = A - C - D - E - G - A

The fingering charts for the pentatonic scales use the 1 2 3 - 1 2 patterns much favoured by Art Tatum at the time.
These are difficult scales to play fluently as they require very flexible wrist actions. Leave them therefore until you are fluent in all other scales.
(Over short pentatonic passages use any fingering that is convenient in the context.)


For fingerings of other Jazz scales see the Scales & Arpeggios Book.


(
Down - Up - Top)

KT 5.4 - The "Five Beers" Scales Exercise

This is an advanced exercise.
It promotes additional flexibility of the wrists. Only use it after you have achieved considerable fluency with your scales.

This exercise reminds me of the old joke about the lumberman who had lost three of his fingers and ordered "Five Beers" by raising his hand in the bar.

  1. Play all twelve major scales over two octaves using thumb (1) and index finger (2) only.

    kbt0503.gif

    You need much wrist movement, especially when moving from the thumb on a black key to the index finger on a following white key.

  2. Next day do the same exercise but now use only the thumb (1) and the third finger (3).

  3. The following day play all scales using only the thumb (1) and the fourth finger (4).

  4. The following day play all scales using only the thumb (1) and the little finger (5).
This is a fun exercises which you can continue for a few weeks, then forget about it for a while.


(
Down - Up - Top)

KT 5.5 - Scales in Octaves

Another advanced method. Do not attempt it until you have achieved good scale fluency and some wrist flexibility.

To help develop the movement of hand, wrist and arm the practice of scales in octaves can be used.

kb003.gif
  1. Keep the wrist high and the hand as though it is locked in position above the keyboard.

  2. Simply lift the forearm from the elbow, then let the hand drop into the keys. The wrist and arm are held firm.

  3. After each note is played, allow the forearm to rebound and the hand and wrist to relax.

  4. Then shift the hand sideways to bring it in position to drop into the next note of the scale.
At first practise playing octaves in this way slowly and deliberately, over two octaves (hold the hand still for a moment in each position before dropping it downwards).

Then practise moving the hand quickly into position above the next note to be played after it has rebounded from the previous note.
Hold it above the note deliberately for a moment before playing again.
Gradually increase the speed of practice.

This technique will eventually give great fluency in octave playing, for all the work is done by gravity, and at speed the hand will appear to rebound from the note after playing.
The hand will move effortlessly from note to note and octave passages will be conceived as a line rather than as a series of notes.


(Down - Up - Top)

KT 5.6 - Practice Material

Metronome
Major scaleTextDemop.1 p.2
Harmonic minor scaleTextDemop.1 p.2
Blues scaleTextDemop.1 p.2
Pentatonic scalesTextDemop.1 p.2


(Up - Top - ? ?)

© 1999 Michael Furstner (Jazclass)