saxh01.gif
Saxophone - Lesson 2
POSTURE

  1. Posture
  2. How to hold the Saxophone
  3. Reed Angles for Saxophone and Clarinet
  4. Wrists and left Thumb
  5. The right hand side keys
  6. Practice
  7. Lonesome Bossa
  8. Practice Material

    Practice Studio

Lesson : Intro | 1 | 2 | 3 | 4 | 5 | 6 | 7 | 8 | 9 | 10 | ??


(
Down - Top)

SAX 2.1 - Posture

A good posture serves two objectives.

  1. to straighten the body resonator

  2. to maintain a relaxed body, essential for the state of active meditation

In some situations a saxophonist has to perform while standing up, in others while seated. Keep this in mind when you practise.
Do not practise in one position only, but become used to playing both standing up and sitting down.

When seated :

  1. have both feet on the ground and pointing forward

  2. sit upright, straight but relaxed

  3. keep the shoulders down, and at right angles to the direction of the feet

  4. hold your head upright (chin up)

The following positions reduce the effectiveness of the body resonator.
  • do not cross your legs !

  • do not twist the body !

  • do not pull the right shoulder back, or the left shoulder up !

  • do not bend your head, or rest your chin on the chest !


(
Down - Up - Top)

SAX 2.2 - How to hold the Saxophone

The weight of the saxophone is transferred via the neck strap to the player's neck.

The neck strap supplied with a new instrument is in most cases of poor quality. The strap band is invariably too narrow, and cuts into the player's neck. This is uncomfortable and painful.
Buy a good strap or saxophone harness. It will improve both comfort and tone quality.

I always use a harness and recommend it to all my students. It distributes the weight of the instrument evenly over both shoulders and leaves the neck and throat free and relaxed.
This is a great help in producing a good tone.

Klondyke (in England and USA) make an excellent harness (Model KSS70). It is made of comfortable wide straps which are adjustable to fit any body size and has two clips for easy installation.

Neotech (in the USA) also make a very easy to put on and most comfortable saxophone harness, the so-called Soft Harness. It is available in two sizes.

Place the strap or harness around your neck and hook it onto the small strap ring on the saxophone. Let the instrument hang at the right hand side of the body.

Place the right hand thumb on the lower thumb rest, the left hand thumb on the upper thumb rest.
Push the instrument with both thumbs forward until both shoulders and both elbows are in line with the upper body and at right angles to the feet.

sax0201.gif

The soprano sax is held forward and in front of the body. In this case keep the line between the elbows parallel to the line of the shoulders. The elbows are held slightly outwards, so that the shoulders and elbows form a 'trapezium'.)

The bell of the instrument (alto, tenor, bari) now rests against the outside of the right thigh, about halfway between the hip and the knee joint.

By pushing either one of the two thumbs forward you can vary the orientation of the instrument.

sax0202.gif

Adjust the length of the neck strap, and balance the instrument with both thumbs so that four things are achieved simultaneously.

  1. shoulders and elbows are in line with the body

  2. the instrument rests against the right thigh halfway between hip and knee

  3. the angle of the reed with the vertical body axis is about 60° - 75°

  4. the head is erect and rests with its upper teeth on the mouth piece

This is the optimum playing position.

The instrument is fully supported by the neck strap and kept in balance by the two thumbs. Passive contact points are the upper teeth (resting on the mouth piece) and the right thigh.

Balance is maintained throughout play. Each breath is taken by simply dropping the jaw, without lifting the upper teeth from the mouth piece.

Some alto-sax and tenor-sax players prefer to position the instrument between the two legs. This is possible, especially with smaller players. But take care that the wrists are not cramped or twisted.


(Down - Up - Top)

SAX 2.3 - Reed Angles for Saxophone and Clarinet

sax0203.gif 
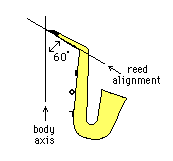
To maintain the optimum reed angle of 60° off the vertical on a straight soprano sax, the player must stretch the arms rather far from the body.
Bent soprano head joints are therefore available for most brands. This reduces the required stretch and relaxes the posture.

Preferred reed angles for the saxophone and for the clarinet are different.

The reed angle for optimum sound production on the clarinet is about 35° off the (vertical) body axis. The clarinet is therefore held much closer to the body than a soprano saxophone.

Never hold a soprano-sax like a clarinet and vice versa.


(Down - Up - Top)

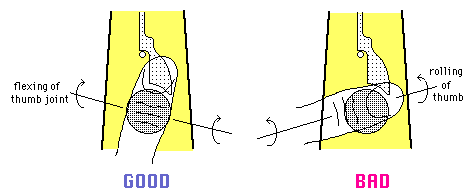
SAX 2.4 - Wrists and Left Thumb

For saxophone playing the wrists should be straight, so that the back of each hand is in line with its connecting lower arm.
This contributes to relaxed finger action and a relaxed body overall.

Bent wrists and twisted shoulders create muscle tensions that easily can result in repetitive strain injury (rsi).

A straight right hand wrist is achieved by pushing the right arm forward so that the right elbow is in line with the body.

Problems with the left hand wrist can develop when the left thumb is incorrectly used for the octave key.
(The position of the octave key varies for different brands. Some models have the hinge on the left side others on the right side of the key.)

For all models : point the thumb upwards and operate the octave key by flexing the joint of the thumb.
This is the most efficient action. It involves minimum movement and keeps the hand still and the wrist straight.

sax0204.gif

Operating the octave key with a near horizontal rolling thumb is very inefficient. It causes excessive hand movement and twists the left hand wrist.

Above all : never take the left thumb off the thumb rest when playing !!

All points discussed also apply to the playing position when standing.
The neck strap perhaps needs adjusting to achieve the best reed angle.
Ideally the alto- and tenor-sax are held free of and in front of the body. During long playing spells the instrument is sometimes leaned against the front of the body. But ensure that both wrists are straight and relaxed.


(Down - Up - Top)

SAX 2.5 - The Right hand Side Keys

Good hand position and wrist orientation is important for the use of the three right hand side keys on the saxophone.
They are in ascending order the side key Bb, the side key C, and the side key high E.

sax0205.gif

The objective is to operate these keys with a relaxed wrist while keeping the right hand fingers close to the keys for low D, E and F.
Operate these three keys as follows :

  • Side key Bb
    Push the palm of the hand (near the index finger knuckle) against the Bb key.

  • side key C
    Rotate the wrist. This depresses the side key C with the side of the hand near the knuckle of the index finger.

  • side key for high E
    This key is too high for a comfortable wrist action. Press the key with a raised index finger, while keeping the other fingers near the low D and E keys.

A good position of the left thumb (pointing upwards) also contributes to easy operation of the high D palm key ('banana' key).
To operate the high D key simply drop the left hand onto it, pressing the key with the left palm just below the index knuckle joint.

For more on fingerings see Lesson 8.


(Down - Up - Top)

SAX 2.6 - Practice

Extend your tone exploration to the major scales of D and F.

Use the side key Bb for the F scale. Do the same exercises as in Lesson 1

For the D scale work from the A downwards and upwards.

D - E - F# - G - A - B - C# - D


For the F scale work from the Bb downwards and upwards.

F - G - A - Bb - C - D - E - F

Extend the exercises over one octave only.

Focus on your playing position. Work on smooth right wrist actions for side Bb and side C, and practise correct flexing of the left thumb joint when using the octave key.


(Down - Up - Top)

SAX 2.7 - Lonesome Bossa

Lonesome Bossa is a slow Bossa in D minor (sax key).
Take the same approach as for Lost in Space : sing in your mind, listen to the sound produced, and feel the vibrations in your body.
Keep your throat as open as you can by simulating the action of yawning.

Continue to play Lost in Space. Play the melody one chorus as written, then one chorus an octave higher.


(Down - Up - Top)

SAX 2.8 - Practice Material


File Name

Contents

solone.gif

Lonesome Bossa - Lead sheet

solonee.mid

Play-a-Long - Alto, Baritone

soloneb.mid

Play-a-Long - Tenor, Soprano

Quiz 2

Test your Knowledge


(Up - Top)

Copyright © 2002 Michael Furstner (Jazclass). All rights reserved.