saxh03.gif
Saxophone - Lesson 7
ARTICULATION

  1. General Approach
  2. Tongue Position
  3. The Four steps of good Articulation
  4. The two functions of the Tongue
  5. Legato Tonguing
  6. Staccato Tonguing
  7. Timing
  8. Practice Material

    Practice Studio

Lesson : Intro | 1 | 2 | 3 | 4 | 5 | 6 | 7 | 8 | 9 | 10 | ??


(
Down - Top)

SAX 7.1 - General Approach

Articulation refers to the way a tone is started ('attack') and ended ('release'). On the saxophone the tongue and the breath are used for articulation.

The tone can be started and ended with the breath, e.g. : "Hoooo"

But usually the tongue is involved, either by :

  • starting the tone with the tongue and ending it with the breath, e.g."daaaa", or

  • starting and ending the tone with the tongue, e.g. "daaat" or "dit".

Ending the note with the breath is achieved by holding the stomach muscles still so that the air pressure in and outside the body are equal.

Never close the throat for articulation on the saxophone, because this

  1. cuts the air column between diaphragm and reed, reducing tone quality

  2. prevents a clean attack

  3. results in incorrect timing (usually late) of a note

In speech throat closure is frequently used, for example when articulating a vowel sound, like "aaa".
Say a few vowel sounds aloud, (like "a" , "o", "e", also "gu' or "ku") so that you become aware of what a closed throat feels like and what you should not do when playing saxophone.

The "gu" or "ku" throat closure is only used as an advanced technique in so called double tonguing for articulating a run of very fast notes : "dugudugudugu" or "tukutukutuku". (But even these sequences always start with a "du" or a "tu").


(
Down - Up - Top)

SAX 7.2 - Tongue Position

In saxophone articulation the tongue is used as a valve.

The tongue presses the tip of the reed against the mouthpiece. This stops the reed vibration and airflow into the mouthpiece, while the air pressure is maintained in the mouth and immediately behind the tongue.
When the tongue is pulled back from the reed, a clean attack and clear tone are produced instantly.

The tongue touches the front edge of the reed.
Which part of the tongue is used for this depends on the relative length of the tongue in relation to the size and shape of the mouth opening.

sax0701.gif

  1. With a relatively short tongue press the tip of the tongue against the tip of the reed.

  2. With a longer tongue this becomes undesirable. For in order to touch the reed with the tongue tip, the bulk of the tongue must be pulled backwards, partly or wholly closing the throat.

    Use therefore a point on the upper surface of the tongue slightly back from the tip (how much depends entirely on the tongue and mouth opening dimensions of the individual player). Press this against the tip of the reed.

  3. In the extreme case of a very long tongue, the tip of the tongue is pressed against the bottom teeth, and the upper side of the tongue is arched upwards against the tip of the reed.

Any of these three tongue positions is correct and just depends on the size of your tongue and mouth. (Larry Teal p.79).
In all cases you should feel the front edge of the reed against your tongue.
Whichever part of the tongue is used, always press it against the tip of the reed.

Do not push the tip of the tongue against the underside of the reed.


(Down - Up - Top)

SAX 7.3 - The Four steps of good Articulation

Good tongue articulation requires the smooth integration of four steps.

Bring the instrument to the mouth and assume the correct embouchure position. Then :

  1. inhale (by dropping the jaw)

  2. press the tongue against the tip of the reed

  3. bring air pressure into the mouth and to the point of the reed

  4. release the tongue from the reed

All following notes are articulated by tongue action alone (steps 2 and 4), while maintaining continued and constant air pressure in the mouth.
The air pressure in the mouth is maintained throughout until the next breath is required. Then steps 1 to 4 are executed again.

Steps 2, 3 and 4 should be in a fluent motion without closing the throat.

Practise them slowly at first. Eventually you will be able to do this in a fraction of a second. This will result in playing each note on time and with a good tone right from the start.


(Down - Up - Top)

SAX 7.4 - The two functions of the Tongue

In saxophone playing the tongue has two functions.

  1. It is used for articulation as explained in this chapter.

  2. But it is also used for voicing of each individual tone, as illustrated by the diagrams in Lesson 5.

To combine these two tasks effectively only the end part of the tongue is used for articulation, while the main body of the tongue remains stationery, maintaining its best shape to voice the sound.

At first this seems a difficult task.
The beginning player uses most, if not all of the tongue for articulation. Tongue movement is sluggish and can affect the tone quality or break the note.

sax0702.gif

Through steady practice the tongue gradually becomes more agile and skilled, until finally the tongue tip seems to float on the air stream and only requires little effort to pull it away from the reed tip.

Tone practice should therefore be carried out in two ways.

  1. Firstly slurred (without tongue articulation) and with the breath only. The focus is on producing the best tone quality and finding the best body resonator shape (including tongue shape) for each note to achieve this.

  2. Secondly with tongue articulation, where notes are articulated with the end of the tongue while maintaining the bulk of the tongue as much as possible in the optimum shape for good tone quality.

This also applies to the Overtone Exercises.
The first priority is to get each Overtone any way you can.
But once you have good control over them play the exercises one day all slurred the next day all tongued.


(Down - Up - Top)

SAX 7.5 - Legato Tonguing

Legato articulation must be subtle but clear.
Each note is started with a light flick of the tongue and held until the beginning of the next note. The tongue action is the same as when you say "daaadaaadaaa", where each "daaa" is one note.
The last note is either :

  • stopped with the breath ("daaah") or

  • with a gentle action of the tongue ("daaad").

You can use different simulated vowel sounds for notes at different pitches, for example "daaaaa", or "deeeee", or "doooo", etc.

At all times keep the throat open. It is never closed in good saxophone playing.


Exercise 1 - Legato tonguing and correct breathing.
Practise this exercise over the G major scale. Repeat each note for two bars. First two bars of the note G, then two bars of A, two bars of B, etc.

Audio 7.1 : Alto - Tenor

sax0703.gif

Breathe on the last beat of each second bar. Practise the four point action.

  1. breathe from diaphragm while dropping the jaw
  2. press tongue against tip of reed
  3. bring air pressure into mouth
  4. release tongue

If you are not sure if the air pressure is in the mouth lighten the embouchure slightly on one side of the mouth. You hear some air escape if the pressure is there.


Exercise 2 - Legato tonguing and rests without breathing.
In this exercise there is a rest at the end of each bar.
During each first bar rest : keep the air pressure in the mouth and the reed closed with the tongue until the start of the first note in the second bar.
Breathe as in Exercise 1 at the end of each second bar.

Audio 7.2 : Alto - Tenor

sax0704.gif

Do not open you mouth or take the air pressure away during the rest in each first bar. Do the 'air leak test' if you are not sure.


(Down - Up - Top)

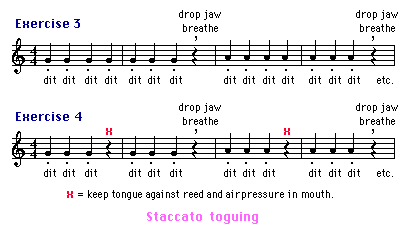
In staccato articulation the note is short and both started and ended with the tongue. Tongue movement is similar to pronouncing "dit" (or "dat" or "dot" for different pitches).

After ending the note with the "t" : do not open the mouth or take the air pressure away, unless you are taking a breath.


Exercises 3 and 4 - Staccato tonguing, rests and breathing.
These are the same as Exercises 1 and 2, but now the notes are played staccato.
Breathe on the last beat of each second bar. Practise the four point breathing and articulation action.

Audio 7.3 (Exercise 3 only) : Alto - Tenor
sax0705.gif

During each first bar rest in Exercise 4 : keep the air pressure in the mouth and the reed closed with the tongue until the start of the first note in the second bar.


Exercise 5 - Legato and Staccato tonguing.
When you are comfortable with Exercises 1 to 4 you can combine the legato and staccato articulation in one exercise.
Use two bars for each note of the G major scale.

Audio 7.4 : Alto - Tenor

sax0706.gif


In this exercise the rest at the end of each second bar is omitted.
Shorten the note on that beat to give you sufficient time to execute the four point breathing and articulation action correctly. Gradually you will be able to do this very quickly and without thinking.

When you are comfortable doing this exercise over the G major scale you may extend it over an increasingly wider range of the instrument.

You need not do the whole range each practice session. Instead select a portion only, but make sure that over a full week practice you have covered the full range.This is a good approach for many exercises.


Exercises 6 and 7 - Increasing the speed.
Exercises 6 and 7 increase the speed of articulation for legato (6) and staccato notes (7). Gradually cover a wide range of your instrument. Start with the G major scale over one octave only, then gradually work your way down and up.

Audio 7.5 (Exercise 6) : Alto - Tenor
Audio 7.6 (Exercise 7) : Alto - Tenor

sax0707.gif

As a separate Exercise : do the first two bars for Exercise 7 only : very slowly for each note of the G major scale. Listen carefully to the empty spaces between the staccatos. There should be no sound at all, no little squeaks or leaking air, only a clear "dit" and then a clean silence.

In each practice session work for 5 to 10 minutes on articulation exercises. This is sufficient to make steady progress in this area.


(Down - Up - Top)

SAX 7.7 - Timing

The difference between a good player and a bad one can be summed up as : TAT

Tone - Articulation - Timing

We have already dealt with the first two. But Timing is also very important.

Good timing of the placement of each note is essential for a good performance.
Good timing requires the development of two skills.

  1. a well developed musical ear.
    It is essential that you know exactly where the beat is. Each down beat is a precise instant in time.

    The average beginning student has only a vague idea of time. A down beat is to his/her ear as wide as a tree trunk. You have to hone the aural perception of time until this tree trunk is reduced to a hair line.

    I always had a good musical ear for picking up melodies from records etc., but it was not until I entered the Music College that I realised how limited my aural perception of music was.
    I found it at first very difficult to recognise the change from one chord to the next (to say nothing about identifying them), and my notion of timing was very crude indeed.
    Perhaps the greatest reward of my musical studies has been the steady development of my musical ear, which has been essential for my work as a music teacher and has increased my appreciation of music enormously.

    The ear will develop over a period of time through regular music practice in general, through playing in good bands, through being corrected by teachers and by listening. Record yourself from time to time while playing with a metronome or a Play-a-Long track.

  2. good time control over all notes played.

    1. The first objective in articulation practice is to get the essential breathing and tonguing action right.

    2. The second objective is to be able to articulate exactly at the right point in time.

    To achieve both objectives practise the Articulation Exercises 5, 6 and 7 with a Metronome.

    There are two Metronome tracks in the Sax Music Library. Metronome 1 taps out each beat, Metronome 2 taps out only beats 1 and 3 of each bar.

Finally play ballads exactly as written on the music provided. Memories for Tomorrow is especially suitable for all the notes are on down beat positions.

Try to place each note exactly on the beat. I promise you, this is not easy but it will improve your timing. Record your effort from time to time on tape to check your progress.

I also recommend you purchase the Duke Ellington Volume of the Jamey Aebersold Play-a-Long CD Series. It includes some great ballads for this kind of practice (Solitude, Mood Indigo, Sophisticated Lady, and others.)


(
Down - Up - Top)

SAX 7.8 - Practice Material


File Name

Contents

sxdit1.gif

Articulation Exercises 1 - 5

sxdit2.gif

Articulation Exercises 6 - 8

sxmt70.mid

Metronome 1 - taps on each beat in the bar
(Tempo is MM = 70)

sxmt35.mid

Metronome 2 - taps on beats 1 and 3 in each bar
(Tempo is MM = 70)

Quiz 7

Test your Knowledge


(Up - Top)

Copyright © 2002 Michael Furstner (Jazclass). All rights reserved.