The position of the lower lip on the reed is also important.
For optimum tone quality : place the lower lip at the point where the curvature of the mouthpiece facing starts (where reed and mouthpiece start to touch).
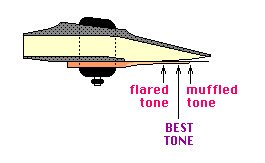
If the lip is too close to the tip of the reed the sound will be muffled.
If the lip is too far forward over the reed the sound will be flared and out of control.
In its proper position the bottom lip contributes, through minute adjustments, to optimising tone quality and pitch.
I recommend you stick a rubber patch on top of the mouth piece to rest your upper teeth on. This prevents the teeth from sliding and makes it easier to stay on the right spot on the mouthpiece. It also improves the embouchure (which need no longer be involved to prevent the sliding).
Rubber patches are available in most music stores. I always cut a piece from a car tyre patch and stick it on with Super Glue. It lasts forever.
(Down - Up - Top)
SAX 3.8 - Practice


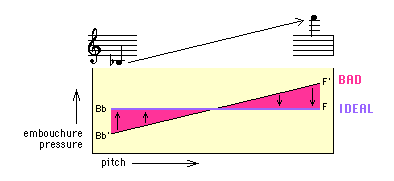
 On a scale from 0% to 100%, where 0% is no pressure and 100% represents the strongest pressure the embouchure can produce (without using the jaw !), the correct embouchure pressure for the saxophone is about 70 - 75%.