(Down Fast - Up - Top)
BR 21.3 - The Opening Lead
The opening lead can be very crucial and in many cases make or break Declarer's contract. It is also the most tricky lead to make for the Defence because the Dummy hand is not yet on the table, and Defenders have had of course no opportunity to signal to each other.
The opening leader must therefore rely on the preceding auction and on the cards in his own hand. Based on this he can make three types of leads
- an attacking lead - aiming to set up winners for his side
- a defensive lead - trying to avoid giving away an early trick to the Declarer
- a trump lead - aiming to reduce Dummy's ability to ruff, or as a defensive lead
1. Attacking leads
Make an attacking lead when
- your Partner has overcalled, showing a quality 5+card suit
Lead that suit. If you hold an Honour in his suit it is usually best to lead it. If not lead a small card.
- you have a long or strong suit yourself
Lead that suit. Lead the card as shown in the Bidding Guide page 14
- you hold a suit with 2 touching Honours or better (a solid, interrupted or internal sequence)
Lead that suit. Top of touching Honours in all cases, except in NT contracts when you hold a 4+card suit (then lead 4th from the top). See Bidding Guide page 14
- you hold a doubleton or singleton
Lead it. But only if you expect to be able to ruff before Declarer is able to draw all your trumps. This is usually only the case when you or your Partner hold the trump Ace or sometimes the King.
(Down - Up)
2. Defensive leads
When your Partner has not bid, you have no long strong suit to lead and hold a hand with a sprinkling of isolated Honours and/or tenaces it is best to make a defensive lead.
Always remember, when the Honours of a suit are divided amongst the four players, the side that leads that suit usually gives away an unnecessary trick to their Opponents.
For a defensive lead always lead a small card of
- a useless 2+ card suit
- the unbid suit
In NT consider leading an unbid major suit, especially after a negative Stayman reply. This indicates that Declarer and Dummy combined have 7 cards in any major at the most.
If you have a doubletone in one of them, Partner must hold at least 4 cards in the suit ! (If you hold 3 be a bit more careful.)
- Dummy's suit if he has bid one, provided you hold no Honour in it yourself
(playing through Dummy's strength)
- the trump suit
- a 4 card suit headed by the Ace
Always lead the Ace in a trump contract, but play 4th from the top in No Trumps.
The above fifth option in a NT contract is quite OK, but in trump contracts only use it if nothing else is available (the lead of an Ace in trump contract is to guard against a singleton King). Leading an Ace is always a bonus for the opposition as it saves them to force it out, usually at the expense of an Honour of their own.
Aces should be used to capture an Honour of the Opponents, not just for making a trick. Kings and Queens, whenever possible, should have that same task.
(Down - Up)
3. Trump leads
A trump lead is the best attacking lead when the auction has revealed that Declarer is likely to depend on ruffs in Dummy to make his contract.
In such case lead
- Ace from A x, then lead again with your small trump
- small from A x x, then lead the Ace next time you gain the lead, followed by your 3rd small trump.
When you hold 3 trumps, Partner will usually hold only 2. By leading a small trump first time, Partner will still have a trump left to lead to you in case he gains the lead before you do.
- small from K x x or J 10 x
Avoid leading trumps when you hold K x or Q x (x) or J x (x), you may lose out on a trump trick yourself.
- small from x x x or x x
But do not lead trumps when you hold 4 trumps or when you hold a singleton (for when you have only one trump your Partner is likely the hold 4). With 4 trumps you are likely to make at least one trump trick yourself.
Also this is an opportunity to try to force Declarer to ruff himself. Keep leading your longest suit (like in a NT contract). If Declarer is forced to ruff twice you have more trumps than he has and you will gain control of the game.
For example :
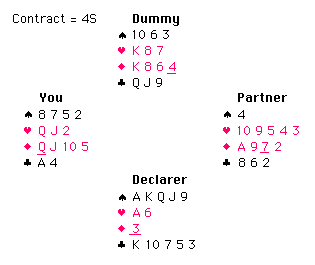
A lead of the Diamond Queen, followed by the Jack forces Declarer to ruff in his own hand. He can only afford to lead trumps 3 times before trying to develop the Club suit.
You win the first Club trick with the Ace, then lead the 10 of Diamonds. Declarer is forced to ruff again, and you now have the only trump left in the game. The contract is doomed.
Any other opening lead (including a trump lead) will present Declarer his contract on a platter.
(Down - Up - Top)
BR 21.4 - Which card to Lead
A listing of the correct card to lead is included in the Bidding Guide BG-14
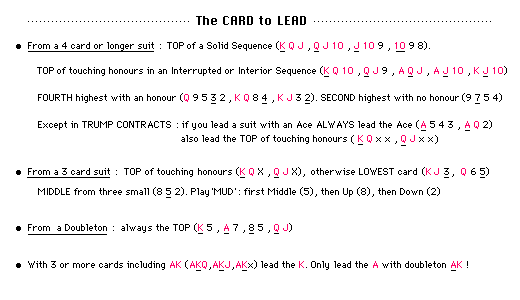 Some Definitions :
- Solid sequence = 3 or more cards in sequence, with at least the top card being an Honour
A K Q - K Q J - Q J 10 - J 10 9 - 10 9 8
- Interrupted sequence = 2 touching cards then a single gap before the next card, with at least the top card being an Honour
A K J - K Q 10 - Q J 9 - J 10 8 - 10 9 7
- Interior sequence = one Honour card, then a gap before 2 touching cards
A Q J - K J 10 - Q 10 9 - J 9 8 - 10 8 7
- Touching Honours = 2 touching Honour cards
A K - K Q - Q J - J 10
- Tenace = 2 cards separated by a single card gap
A Q - K J - Q 10 - J 9 - 10 8
Leading Partner's suit
When Partner has overcalled a suit and it is your turn to lead it is generally best to lead your Honour card in his suit, if you have one. This avoids blocking the suit. It also provides Partner with a clear picture of the combined strength of the suit and helps him to decide whether to pursue with the suit or not.
The Underlead
Partner has a small Heart, Dummy plays low. Which card do you lead ?
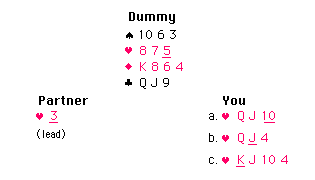
When Partner leads a low card of a suit in which you hold touching Honours or a solid sequence : play the lower card of touching Honours. This leaves Declarer in the dark as to who holds the other Honour(s), and at the same time shows Partner that you might have the higher Honour too.
Therefore
- In Case a. (above) play your 10
- In Case b. (above) play your Jack
- In Case c. (above) it is best to play your King
When leading the suit yourself however, always play the top of touching Honours.
Therefore if in Case c. (above) the King wins the trick, lead your Jack back to Partner at the next trick.
(Down Fast - Up - Top)
BR 21.5 - Signals
A Defender can make a card signal when he is not required to compete for a trick, or when he is void in a suit and can discard a card from an other suit.
An unnecessary high card, followed (if possible) by a low card on Partner's lead or as a discard is encouraging (a "high - low" signal). Playing a low card first is discouraging.
For example :
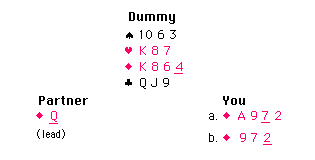
- In case a. play your 7, an unnecessary high card, showing Partner you hold the Diamond Ace
- In case b. play your 2, a low card showing Partner you have no Honour in the suit
A high card is usually anything between a 6 and a 9, a low card between 2 and 5. But even a 4 followed by a 3 can be an encouraging high-low signal. It all depends on the cards the signaller has at his disposal.
A discard works in the same way.
When you are void in the suit lead discard a relatively high card of the suit you wish Partner to lead to you. If you don't want that suit lead to you, play a low card.
(Down - Up)
The Mc Kennie Discard
Say you hold a long Spade suit in a NT contract and want to signal to Partner to lead that suit. Discarding any Spade from your hand is really the last thing you would want to do in such case.
|
The Mc Kennie discard is a useful and popular devise that gets around this problem.
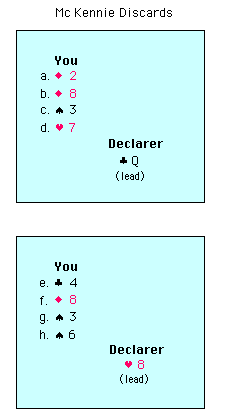
The Mc Kennie discard signals for one of the suits not played to the trick.
For example if a Club is lead (a suit in which you are void) and you discard a Diamond, you signal for one of the two remaining suits : Hearts or Spades. If you play a high Diamond, say an 8, you ask Partner for a Spade lead (the higher ranking of the two target suits), but if you play a low Diamond, a 2 for example, you ask for a Heart lead.
In the examples on the left :
- In case a. you signal for a Heart lead
- In case b. you signal for a Spade lead
- In case c. you signal for a Diamond lead
- In case d. you signal for a Spade lead
- In case e. you signal for a Diamond lead
- In case f. you signal for a Spade lead
- In case g. you signal for a Club lead
- In case h. you signal for a Diamond lead
|
(Down - Up - Top)
BR 21.6 - Defence against the Finesse
Defence against the finesse is based on a very simple principle :
- Rule
Only cover an Honour with your own Honour if it promotes a trick either in your or in Partner's hand
If this is not the case always play low, and let Declarer guess. He will guess wrong some of the times.
Whether you can promote a trick in your own hand is easy to determine. To judge whether you promote a trick in Partner's hand you have to look for any missing cards (usually J, 10 , 9) ranked below the Honours exposed on the table.
Here follow some examples.

- Play low, there is nothing to promote.
- Play the King, this forces out Declarer's Ace. He may then decide to finesse against the 10 in which case you will win a trick
- Play low 1st time. When Dummy plays the Jack next time, cover it with your King. This will promote your 10 to a sure trick.
- Play low, very very smoothly. Declarer probably holds K J 10 and can try the finesse both ways. He is testing out your reaction. If you fumble you are a cooked goose. If you play very smoothly he may decide to go up with Dummy's Ace and finesse your Partner on the next trick. In that case you will win.
- Play the King. It forces out Dummy's Ace. Dummy's Jack will make a 2nd trick, but you will win the 3rd trick with your 10.
- Play low. There is nothing you can do to prevent Declarer playing a double finesse against you if he decides to do that. Don't split you Honours.

|
(Down Fast - Up - Top)
BR 21.7 - Finesse by the Defence
The finesse techniques described in Lessons 9, 10 and 15 apply equally well to the Defence as to the Declarer play. The only difference is that each finesse manoeuvre by the Defence must be executed by both players instead of one.
Below follow some typical examples and their correct way of execution.
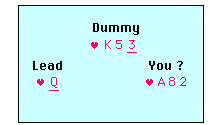
All top of a solid sequence and top of touching Honours leads are a first move for a
potential direct finesse against leader's left hand Opponent.
In this case if Dummy plays the King cover it with your Ace. If he plays small play your 8, showing Partner you hold the Ace. |
|
|
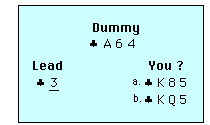
In case a.
if Dummy plays low play your King. If Dummy plays the Ace, play your 8, showing Partner you have an Honour.
In case b. if Dummy plays low, play your Queen. If Dummy plays the Ace, play your Queen too, to unblock the suit for Partner. He may have a 5 card suit.
|
|
Rule - As Defender always play the lower card from touching Honours, except when making a lead.
(Down - Up) |
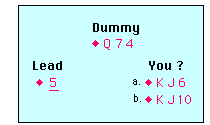
In case a. if Dummy plays the Queen, cover it with your King. If Dummy plays low, play your Jack.
In case b. if Dummy plays the Queen, cover it with your King. If Dummy plays low, play your 10 (the lower card of touching Honours).
|
|
|
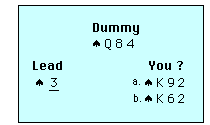
In case a. if Dummy plays the Queen, cover it with your King.
If Dummy plays low, play your 9.
In case b. if Dummy plays the Queen, cover it with your King.
If Dummy plays low, play your King.
|
|
Rule - When Dummy has an Honour which you as third hand can beat, only play your Honour if Dummy's Honour is played or if your next card is lower than the 9
(Down - Up) |
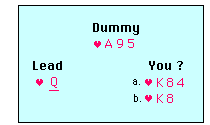
In case a. if Dummy plays low, play your King.
If Dummy plays the Ace, play your 8, showing Partner you hold an Honour.
In case b. if Dummy plays low, play your King.
If Dummy plays the Ace, unblock the suit by playing your King.
|
|
When Partner leads his long suit and you hold one or two Honours but only one small card in the suit, unblock your access to Partner's hand by playing your High cards first, keeping your small card to lead back to him for last.
|
(Down Fast - Up - Top)
BR 21.8 - Other Techniques
Other techniques, including the duck (lesson 17) and the hold up (lesson 18) are common to both Declarer play and a good Defence.
Here follow a few examples.
1. The Defensive Duck
Declarer is in a Spade contract and your Partner leads the 9 of Diamonds. Dummy plays low.
What do you play ?
Partner most likely leads the top of a doubleton and is hoping for a ruff in the suit. Should you play your Ace and then return a small Diamond ? No !
If you do that next time Partner gains the lead he has no Diamond left to lead back to you.

Therefore duck the first round, but play the 7 showing Partner he should lead the suit again. Next time you or Partner gains the lead (hopefully before Declarer has drawn all Partner's trumps), either one can lead a Diamond again. Win this second trick with your Ace, then lead a third Diamond for Partner to ruff.
Here another example. Declarer is in a No Trump contract this time.
You lead 4th from the top of your longest suit, Spades. Dummy plays low and Partner wins with the King.
Partner at trick 2 leads a small Spade. Declarer plays low, what do you do ?

Don't play your Ace, but duck, play a small Spade and let Dummy win with the Jack.
When Partner regains the lead he has still a Spade left to return to you, Declarer's Queen will drop under your Ace and you are on lead to cash two more Heart winners.
(Down - Up)